

摘要
“04 Guide for New Maplers” is an official guide from MapleStory M Official News on 2025-01-15. Its canonical Nexon thread and publication metadata are retained for source-backed verification.
正文
Welcome to the Maple World, New Mapler!
To help you enjoy MapleStory M more easily, we’ve prepared a guide for new Maplers covering basic gameplay settings, auto battle, growth tips, and in-game convenience features.
|
Basic Gameplay Settings |
Customize your screen and key settings to create a more comfortable gaming experience tailored just for you! You can check the basic configuration methods in the [Options Menu] guide.
01. Quick Menu Settings
- Access [Quick Menu Settings] via the far-left of the Quick Menu or the bottom-left corner of the Main Menu.
- Select icons in your preferred order to customize your Quick Menu, allowing up to 8 items.


02. Menu Editing
- Customize the arrangement of menus through [Menu Editing] in the [Menu Settings] located at the bottom-left of the Main Menu.
- Place frequently used menus at the top or rearrange them however you like!

03. Skill Key Settings
- In the Skill Window, you can choose between Type A and Type B button layouts. Type A allows for detailed button customization.
- Type A supports up to 5 skills, while Type B supports up to 8 skills. As you level up and unlock more skills, we recommend using Type B for a wider range of skill options.
- For more detailed instructions on skill settings, refer to the [Character Skills] guide!

04. Preset Settings
- Access the Preset feature through the Preset button on the right side of the main screen to save and switch presets.
- You can save your current equipment, appearance, skills, link skills, jewels, Legion settings, and android configuration into a preset.
- Up to 3 presets can be saved, and there is a 5-second cooldown time after switching presets.
Note: If only presets for skills, link skills, jewels, or Legion settings are changed (without altering other configurations), the cooldown time does not apply.

|
Enjoy Auto-Battle |
To fully enjoy MapleStory M, setting up basic auto-battle options is essential!
Check out these tips for making the most of your auto-battle experience!
01. Auto-Battle
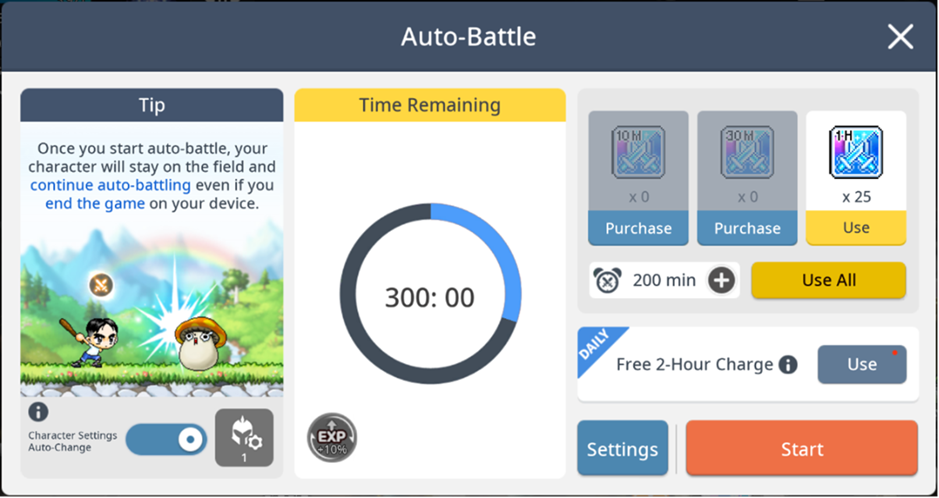
- Once auto-battle starts, your character will remain in the field and continue battling even if you close the game on your device.
- EXP gained during auto-battle are increased by 10%.
- For more details on auto-battle, refer to the [Auto-Battle] guide!
02. Pet Settings
- If your character frequently dies during auto-battle, try adjusting the automatic potion usage setting to 70%-90%.
- You can register character buffs, including the Fever Buff, on pets with the [Pet Auto Buff Skill] for automatic use.
- Buff potion items can also be registered to pets with the [Pet Auto Buff Skill] for automatic use. If you have EXP Increase items, be sure to use them!
- For more details on pets, refer to the [Pet] guide!

03. Fever Buff Purchase
- Select and purchase the desired buff from the [Fever Buff List]! The effects become stronger as your level increases.
- Tap the Fever button before the Fever gauge fills up to view the [Fever Buff List].

04. Storage
- If your inventory gets full during auto-battle and becomes inconvenient, use the storage function to store your items.
- You can access the storage by talking to the Storage Keeper NPC, Mr. Kim, or the Storage Keeper in town.
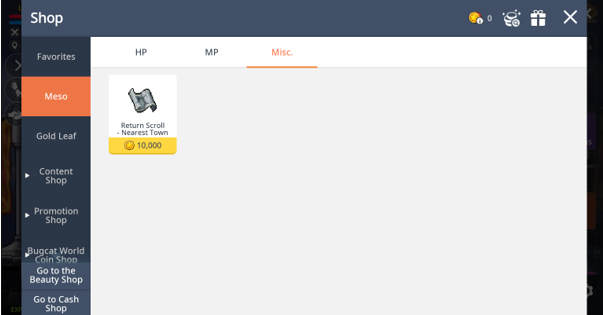
- If you want to return to town immediately, you can purchase and use the [Return Scroll - Nearest Town] item from [Shop – Meso – Misc.]!

05. Setting Potions
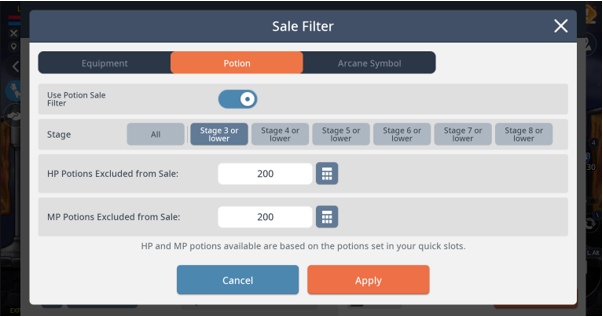
- Use the sale filter function to quickly sell potions obtained during auto-batt;e without having to click multiple times.
- Select the sale filter in the bottom-left of the [Inventory – Sell] menu, then choose the potion sale filter options in the potion tab.
- You can choose options such as the potion level to sell and the number of HP/MP potions to exclude from the sale.
|
Growth |
Knowing how to grow your character and equipment is incredibly helpful!
For more ways to enhance your equipment, check out the [Forge] guide.
01. Level Up
- As your character level increases, you'll gain access to more skills and content.
- Complete daily quests and daily hunting tasks to earn EXP, and hunting in higher-level Star Force fields, The Edge of Space, or Arcane Power fields is also a great way to earn EXP.
02. Star Force Enhancement
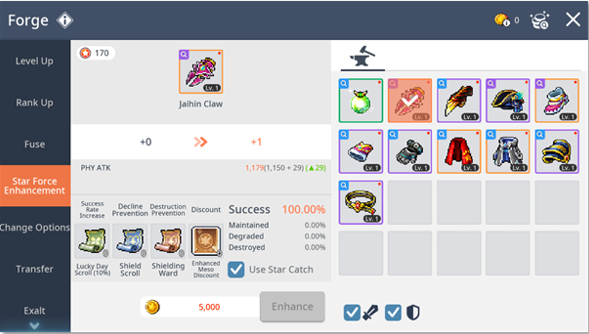
- Strengthening your Star Force allows you to hunt in higher-level Star Force fields, enabling faster leveling.
- For more detailed information about Star Force, refer to the [Star Force Enhancement] guide!
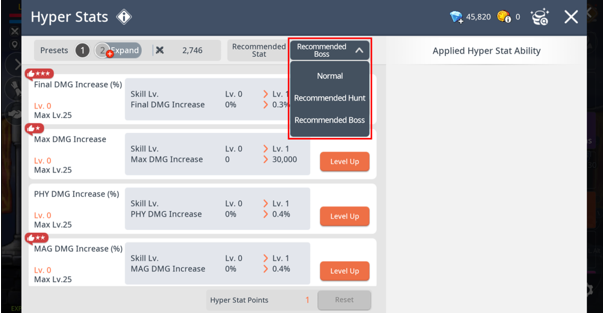
03. Hyper Stats
- Available from level 141 onwards, this feature allows you to level up your desired stats.
- If you're unsure which stats to level up, try using the Hyper Stats recommendation feature.
- For more detailed information about Hyper Stats, check out the [Hyper Stats] guide!
|
Trade Station |
You can use the Trade Station to sell or purchase items you own.
Sell your equipment or items to earn Mesos, or use your Mesos to buy the equipment you want.
01. How to Use the Trade Station
- You can access the Trade Station through the Eggrich NPC in each town or by clicking the Trade Station icon in the menu.
- However, to use the Trade Station for the first time, you need to clear the [Maple Adventure] content in the [Menu] to obtain the Trade Permit.

- You can search for desired items or use filters in the Buy tab to view the items you're looking for.


- Click the [Buy] button to purchase the selected item, and the purchased items can be found in your character's inventory.
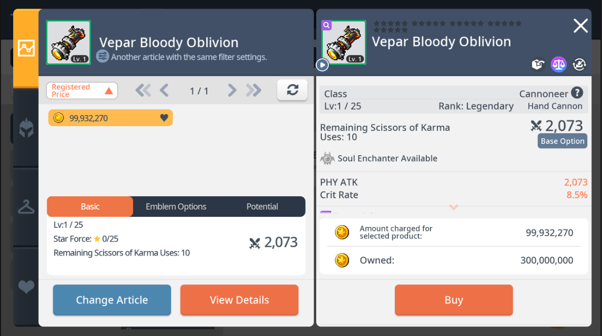
- Select the [Sell] tab in the Trade Station, then choose the desired item from your inventory on the right side of the screen. Enter the quantity and price, and you can register the item for sale.
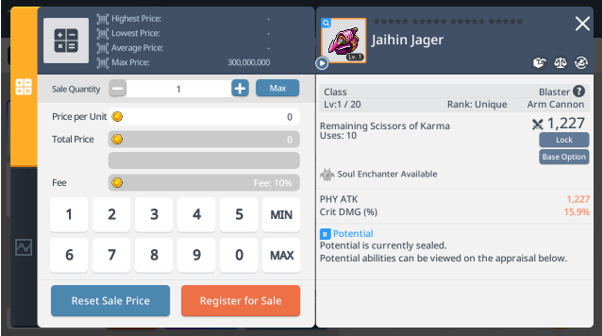
- For more detailed information about the Trade Station, check out the [Trade Station] guide.
|
Options & Features |
Knowing the convenience features available in MapleStory M will make your experience much easier!
Here are some useful options to keep in mind!
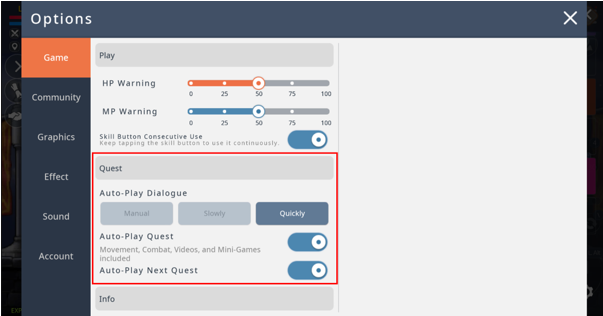
01. Quest Options
- You can select quest progress options in [Settings – Game].
- Set the dialogue speed and toggle the auto-progress options for quests and the next quest.
- If you want to speed up your quest progress, try adjusting these options!
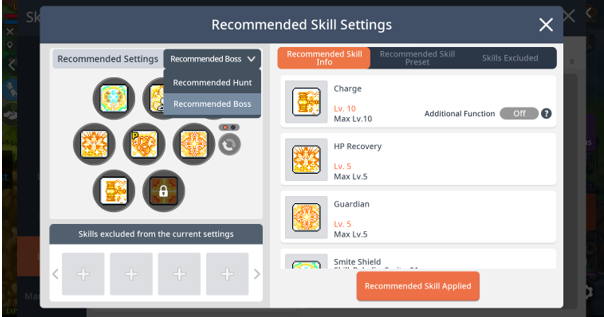
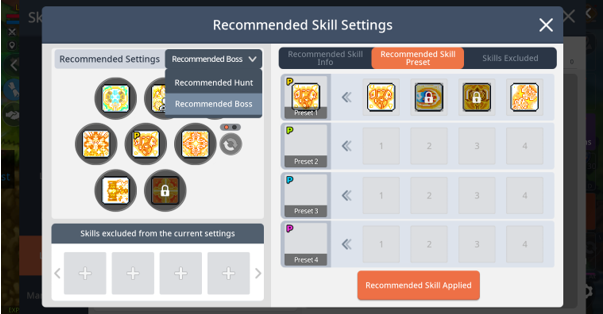
02. Skill Recommendation Settings
- The skill recommendation setting feature is available from level 100 onwards.
- By clicking the [Recommended Settings] button at the top of the skill window, you can apply recommended skill setups for hunting or bosses.
- You can also apply skill presets, allowing you to use multiple skills in order within one quickslot, via the recommended settings.
03. Party Search Feature
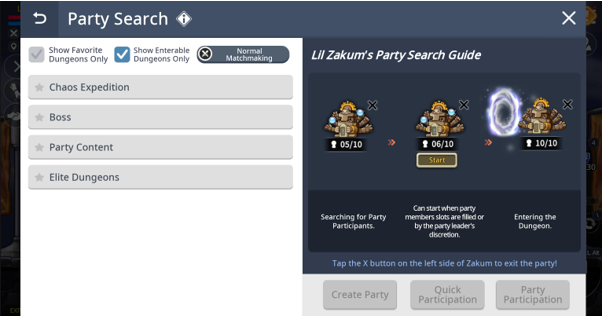
- You can easily find a party through the [Party Search] in the quick menu or the [Party Search] button at the top of the quick content.
- Click the difficulty button of the desired content to view a list of available parties at a glance.
- Additionally, by selecting the Bundled Matching mode during matchmaking, you can register multiple contents at once and join the party for the content that fills up first.
04. Extract Filter Feature
- You can extract unnecessary items to obtain Occult Cubes and Gold Leaves.
Set up an extraction filter to extract the filtered items right away without having to click multiple times.
- The extract filter can be used by clicking the filtering button at the bottom left of the extract window.
- In the extract filter, you can select options such as item type, rarity, and potential ability grade to filter the items you want to extract.

05. Maple Guide Filter Feature
- The Maple Guide recommends content based on your current character level or the selected level.
- In [Content by Level], you can quickly view content that offers the rewards you're looking for using the filter.
- For more detailed information about the Maple Guide, check out the [Maple Guide] guide.

此系列的更多內容
這筆攻略內容僅屬於 MapleStory M。下方相關頁面也按此系列獨立整理,不會與其他 MapleStory 作品混用。
來源與核驗
上方已在本站顯示可閱讀正文;來源頁面只作為引用與後續更新核驗。
MapleStory M Official News