 MapleStory WorldsGLB
Understanding Localization in MapleStory Worlds

Summary
An official hands-on lesson for LocaleDataSet, LocalizationService, text keys, client language behavior, translators, and localized image or resource selection.
Article body
Understanding Localization


Course Introduction
A localization process is a must if a creator wishes to ensure their world is enjoyed by users of multiple regions.
LocalizationService helps to provide text or resources that match the user's app language settings. In this lesson, we will explore the concept of translation and how to use LocalizationService.
Reference Guide
Localizing to Format
Automatic Translation
LocalDataSet
API Reference
What is localization?
In the simplest sense, localization is basically translating a word or phrase that the user sees in the worlds. For example, a World may have been created in Korean, but when users who have set their client language to English enter that World, a word like 사과 will be automatically translated as apple. However, the difference between translating and localizing is supporting not only the basic meaning of the language, but also the cultural context and tone of the world's many elements.
Localization is the process of translating the language and various elements of a world appropriate to the desired language and culture. An example would be how different regions list their dates. In Korea, the order is Year/Month/Day, (01/31/2023). In America and Canada, the order is normally Month/Day/Year (01/31/2023). In others, the order can be Day/Month/Year (31/01/2023).
The way numbers are written also differs in different regions. For example, people write the number 1234567.89 as 1,234,567.89 in South Korea, the United States, and Canada. They use a comma (,) as the thousands separator and a period (.) as the decimal point. However, in France, Germany, and Austria, they write it as 1.234.567,89. They use a period (.) as the thousands separator and a comma (,) as the decimal point. Some regions even use spaces instead of thousands separators, such as 1 234 567.89.
Therefore, considering the expectations of users from different cultures and regions, it is necessary to express dates or numbers in formats that correspond to those regions. As such, localization is not just a simple translation, but the entire process of adjusting content so that users connecting from each cultural area can use content without confusion or inconvenience.
Localization of MapleStory Worlds
MapleStory Worlds is aiming for a long-term global one build. As such, it is possible for clients from different regions to be connected together on a single server. So MapleStory Worlds supports simultaneous translation into multiple languages from a single text.
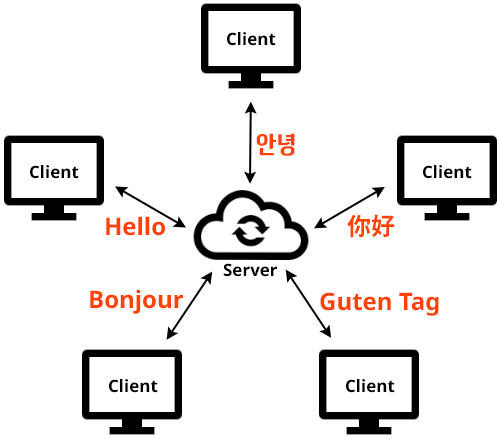
However, the server should send the Localizing Key instead of directly sending the localized message itself. It communicates with the localizing key and outputs different data for each client language setting. Let's take a look at how to do actual localization in MapleStory Worlds with an example.
Translate Text
You need to create a translation table to translate text according to the client language setting.
Create LocaleDataSet
Let's use LocaleDataSet to translate text in a simple way.
-
Add a text entity in the UI editor.
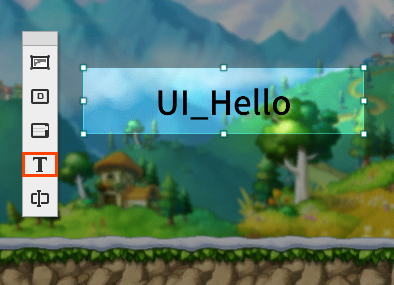
Modify the property in TextComponent for the new text entity as follows.Component Property Value TextComponent FontSize 50 Text UI_Hello IsLocalizationKey True -
Create LocaleDataSet and enter the following.
ID Key Source ko en 1 UI_Hello Hello! 안녕하세요! Hello! -
Press the
 [Start] button and run a test with the client's language set to Korean.
You can see that 안녕하세요! is displayed.

-
Change File - Setting - Others - General - Language to (English) in the navigation menu.
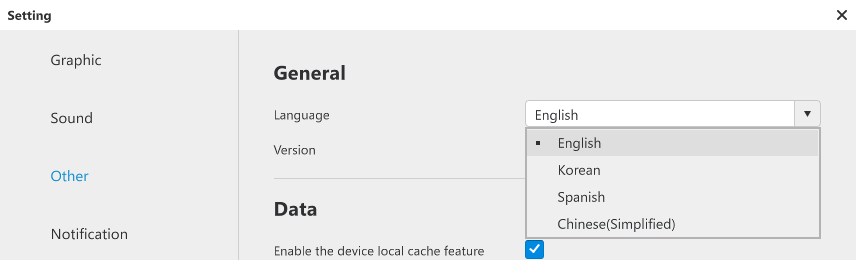
-
Press the
[Start] button and run a test. Hello! is displayed.

GetText Function
You can easily set the TextComponent text to be translated with IsLocalizationKey, but use the GetText() function when you need to translate other texts or control translation in a script.
The GetText() function finds a row in the Key column of the translation table with the same value as the key received as argument and returns the text value from the same column as the client language code in that row.
Let's look at how to display text for each language setting of the client with a simple example. Let's place 2 NPCs on the map and display appropriate names according to the language settings.
-
Place 2 NPCs on the map. In this example, we have placed the two NPCs below.

-
npc-931
-
npc-845
-
-
Modify the name of each NPC entity as shown below.
NPC Entity Name 
Stan 
Rina -
Create LocaleDataSet and enter as follows.
ID Key Source ko en 1 UI_TEXT_NPC_Stan Stan 스탄 Stan 2 UI_TEXT_NPC_Rina Rina 리나 Rina -
In the context menu of Workspace - MyDesk, click Create Scripts - Create Logic to add a new logic with the name LocalizationTest.
-
Add properties to LocalizationTest as follows.
Property: [None] Entity Stan = /maps/map01/Stan [None] Entity Rina = /maps/map01/Rina -
Add the
OnBeginPlay()function and enter the following. Set the execution space to client only.[client only] void OnBeginPlay() { self.Stan.NameTagComponent.Name = _LocalizationService:GetText("UI_TEXT_NPC_Stan") self.Rina.NameTagComponent.Name = _LocalizationService:GetText("UI_TEXT_NPC_Rina") } -
Press the
[Start] button and run a test with the client's language set to Korean.
You can see that the NPC names appear as below.
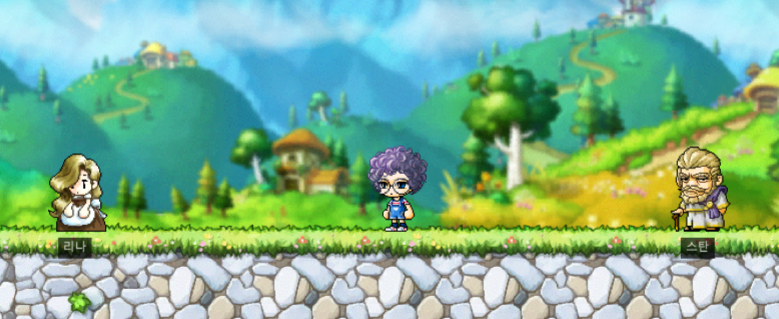
If you change the language settings to English, you can see that the NPC names appear in English as shown below.
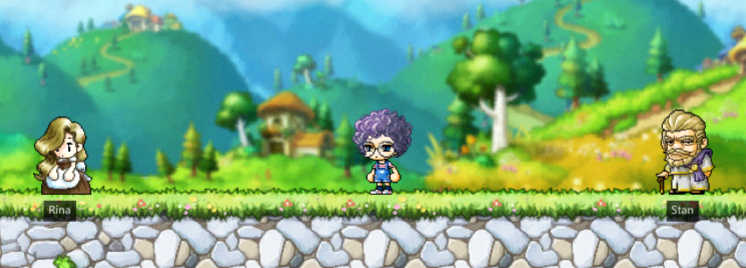
Translator
The LocalTranslator property is in LocalizationService.
-
The type of the LocalTranslator property is Translator.
-
LocalTranslator includes LocaleId (string type property).
The next two lines of code return the same value.
_LocalizationService:GetText("UI_TEXT_NPC_Stan")                   -- Stan
_LocalizationService.LocalTranslator:GetText("UI_TEXT_NPC_Stan")     -- Stan
LocaleId of LocalTranslator is the language code for the currently executing client.
For example, if the language for the currently executing client is Korean, the LocaleId of LocalTranslator is ko.
If you call a function such as GetText() directly without using Translator created separately in LocalizationService, the function is performed based on the LocaleId for LocalTranslator.
If the current client language setting is Korean and you want to import an English translation, you can write the code as follows.
local enTranslator = _LocalizationService:GetTranslatorForLocale("en")
enTranslator:GetText("UI_TEXT_NPC_Stan") -- Stan
Resource Localization
The resources as well as the text can be localized as needed.
Let's go through an example.
-
Press the [
 ] image button to create an empty image and change its name to SpriteTest in the UI editor.
 -
Generate a new script component, SpriteLocalization. Then, add the component to the SpriteTest image created above.
-
Open the SpriteLocalization script and add the property as follows.
Property: [None] string ResourceKey = "" -
Add the
OnInitialize()function and write its content as follows. Set the execution space to client only.[client only] void OnInitialize() { self.Entity.SpriteGUIRendererComponent.ImageRUID = _LocalizationService:GetText(self.ResourceKey) } -
In the SpriteTest property editor, enter RESOURCE_LOGO to SpriteLocalization - ResourceKey.
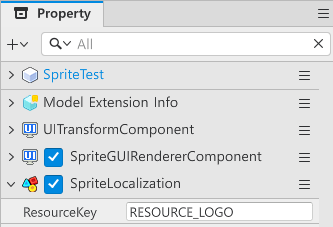
-
Open LocaleDataSet and add the following content.
-
Key : RESOURCE_LOGO
-
Source : 3110502e753742d39794e042c2657ce5
-
ko : 7ae6a288ee884b75a44851c59b595789
-
en : 3110502e753742d39794e042c2657ce5
-
-
Press the
[Start] button and run a test.
The Korean logo appears when the language setting is Korean, and the English logo appears when the language setting is English.
Was the content on this page useful? Please share your thoughts.
Please let us know if there is an error on the page, or if you have any additional opinions. Error Report
More from this series
This Guides entry belongs to MapleStory Worlds. Related pages below keep this series separate from other MapleStory games.
Source and verification
MPStorys shows the readable on-site body above. The source page remains attached only as a citation and update trail.
MapleStory Worlds Creator Center Guides